How to auto turn off laptop screen while using external monitor - ideapad - Windows
Steps and instructions to auto turn off laptop screen while using external monitor - ideapad - Windows
Steps and instructions to auto turn off laptop screen while using external monitor - ideapad - Windows
Description
This topic describes how to make the system screen turn off automatically after connecting an external monitor. After the external monitor is disconnected, the screen works normally.
Applicable Brands
ideapad
Operating Systems
- Windows 10
- Windows 11
Solution
- Plug the monitor's power cord into an outlet, then plug the video cable into the video output port on the PC and the video input port on the monitor. Turn the monitor on.
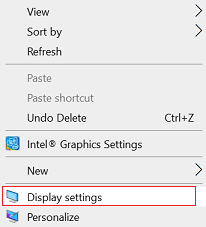
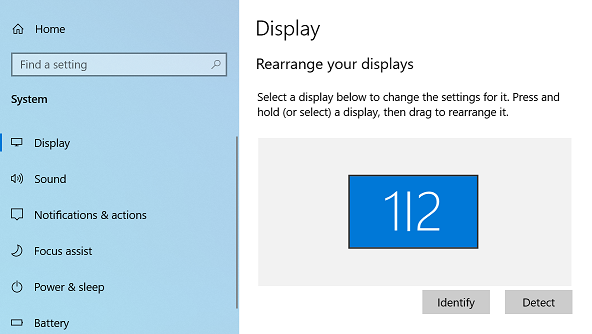
- Right-click the Windows desktop and select Display Settings from the drop-down list. If two monitors are not displayed normally, click Detect.
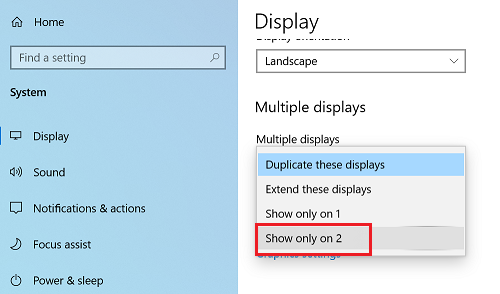
- Select Show only on 2 from the drop-down list. By default, the display is listed as Display 1, so switching to Display 2 puts the picture on the second monitor, while the PC monitor becomes blank.
Note: Some ideapads support the F7 or F10 function key to access the Project option to select Internal only, Duplicate, Extend, or Second (external) Screen only.
Additional Information
Windows allows the use of multiple displays or switching between available monitors. Monitors are of different connection types, so make sure the system has the same connection type as the monitor and that you have the cable to connect the two. For example, if the monitor uses a VGA connection, the system must have a VGA port, and a VGA cable is needed to connect the system to the monitor.
Related Articles
Boli tieto informácie užitočné?
Vaša spätná väzba pomáha zlepšiť celkovú používateľskú skúsenosť
ID dokumentu:HT504128
Original Publish Date:11/27/2017
Dátum poslednej úpravy:01/15/2025

