BIOS for Windows 10 (64-bit) - Legion T530-28ICB, Legion C530-19ICB, Legion T5-28ICB05 Desktop
BIOS for Windows 10 (64-bit) - Legion T530-28ICB, Legion C530-19ICB, Legion T5-28ICB05 Desktop
Available Drivers
File name
Size
Version
Operating System
Release Date
Severity
Options
BIOS for Windows 10 (64-bit) - Legion T530-28ICB, Legion C530-19ICB, Legion T5-28ICB05 Desktop
13.957 MB
O4BKT24A
Windows 10 (64-bit)
10 Jul 2023
Recommended
Description
This package provides BIOS and is supported on Legion T530-28ICB, Legion C530-19ICB, Legion T5-28ICB05 Desktop and running the following Operating Systems: Windows 10 (64-bit)
What's More
Notes About the BIOS Version of the BIOS package.
- The BIOS package supports two generation of Chipset (with Onboard VGA and without Onboard VGA) with two kinds of BIOS.
- The BIOS package can detect what kind of Chipset you used in the system and BIOS will be updated accordingly, you may check BIOS version in BIOS Setup after BIOS update completed.
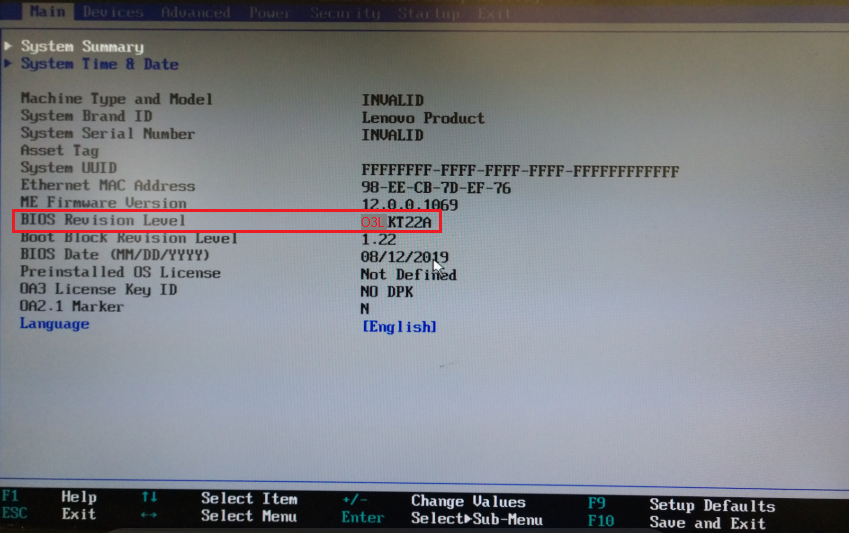
- The Steps to check BIOS version in BIOS setup.
1.Power On the unit.
2.Press “F1”during BIOS PSOT to enter BIOS Setup.
3.Check the region as marked red below:
O3LKTxxA → With Onboard VGA SKUs
O4BKTxxA → Without Onboard VGA SKUs
Supported Systems
- Lenovo Legion C530-19ICB
- Lenovo Legion T530-28ICB
- Legion T5-28ICB05 Desktop
Supported Operating Systems
- Windows 10 (64-bit)
Flash Under Operating System
- Please make note of any settings you have changed in the BIOS Setup utility. They may have to be re-entered after updating the BIOS.
- Click on the Start button and type cmd.exe. Right-click on the cmd.exe application and select run as administrator to open the Command Prompt with Administrator privilege.
- In the "Command Prompt" window, change to the directory where the above files were extracted. The command to go to the location is "cd C:\SWTOOLS\FLASH\O4BJYnnUSA", where "nn" represents the two digit flash level.
- Enter the command "flash.cmd" and press the Enter key to start the flashing process.
- You may first see a confirmation prompt "Proceed with BIOS update now?". Click "Yes" to continue.
- You will see the prompt "Would you like to update the Serial Number?". Input "n" and press Enter.
- Then you will see the prompt "Would you like to update the Machine Type and Model?". Input "n" and press Enter again. Then the BIOS update process will start.
- The update may take up to 2 minutes. Do not power off or restart the system during this procedure! After the Windows update process ends, the system will automatically reboot to continue the flash process.
- After the system reboots, the BIOS update process will continue with a simple graphic UI. When the BIOS update process ends, the system will reboot automatically.
- The BIOS update process ends with above nine steps.
Notes: You may see a POST error "0162: Setup data integrity check failure" after step 9.Press F1 to enter BIOS Setup Utility, and then press F10 to save your settings.
Was this information helpful?
Your feedback helps to improve the overall experience
Last Modified Date: 10 Jul 2023
Original Publish Date: 11 Jun 2018
Document ID: DS503832
