How to run the LCD Self-Test - ThinkPad, Lenovo Notebook, Thinkbooks
Steps and instructions to Run LCD Self-Test on ThinkPad - Step by Step Guide
Steps and instructions to Run LCD Self-Test on ThinkPad - Step by Step Guide
Description
The LCD self-test is for testing the functionality of the LCD panel of a notebook without the need of an external display. The test can be used if the machine shows a blank screen when powered on. Use this test as part of the LCD diagnostic testing. Note: Check the Hardware Maintenance Manual to see if your model supports the LCD Self-Test.
For example: T490s Hardware Maintenance Manual (page 39 and 40 or 45 and 46 on document outline).
Applicable Brands
- ThinkPad
- Lenovo Notebook
- Thinkbook
Applicable Systems
Most ThinkPad products released after 2022.
X Series
- ThinkPad X390 Yoga
- ThinkPad X390
T Series
- ThinkPad T490s
- ThinkPad T490
- ThinkPad T590/ThinkPad P53s
L Series
- ThinkPad L390 Yoga FO
- ThinkPad L390/L390 Yoga
- ThinkPad L490
- ThinkPad L590
X1
- X1 Next
- ThinkPad X1 Carbon (7th Gen)
- ThinkPad X1 Yoga 4th Gen
A Series
- ThinkPad T495
- ThinkPad X395
- ThinkPad T495s
For Lenovo Notebook and Thinkbook applicable systems, refer to List of Consumer & Thinkbook Laptops that support LCD Self-Test.
Solution
Use the following steps to run the LCD Self-Test:
- Turn off the computer.
- Connect the AC power adapter.
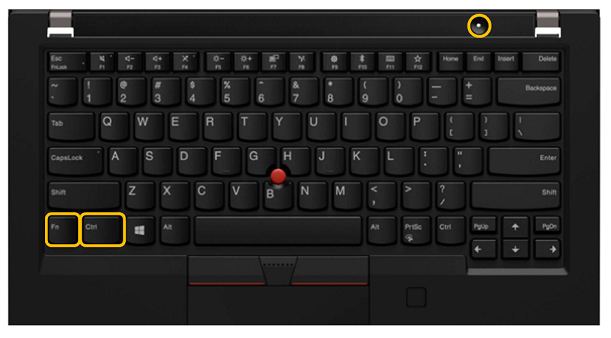
- Press Fn, left Ctrl, and the power button at the same time. If the LCD panel displays at least five solid colors in sequence across the entire screen, it indicates that the LCD is functioning normally.
- The test lasts for about 20 seconds and then the computer turns off automatically, or press the power button to exit the test.
If the LCD displays various images with colors similar to the following when testing, then the LCD is working as expected.

Contact Us for support and provide the information from the LCD Self-Test.
Related Articles
您的反馈有助于改善整体体验

