Operating System Recovery Process Quick Start Guide - ThinkSmart Edition Tiny M920q, ThinkSmart Core for Logitech
OS Recovery Process Quick Start Guide - ThinkSmart Edition Tiny M920q, ThinkSmart Core for Logitech
OS Recovery Process Quick Start Guide - ThinkSmart Edition Tiny M920q, ThinkSmart Core for Logitech
Description
Describes how to restore the Operating System from Lenovo Cloud Deploy (https://lenovoclouddeploy.com) for the following devices:
Also available is: [PDF] ThinkSmart Edition Tiny (M920q) and Core for Logitech: Recovery Instructions
Lenovo Cloud Deploy allows customers to store a custom preload, image, or provisioning process in the Cloud, ready for access via secure credentials by mobile users anywhere, anytime.
Applicable Systems
Operating Systems
- Windows 10 IoT
- Windows 11 IoT
Technical Requirements
- Microsoft Windows 10 or higher
- .NET Framework 4.8 or higher must be installed
- Local Ports 5555, 55819
- Internet Connection (a wired internet connection is required when using online USB media)
- Quick Image Capture – 9 Mb/s upload
- Quick Image Restore, Restore System Wizard, Package Transfer – 1 Mb/s download
- 32 GB USB Key (2.0 or 3.0) or greater if caching the image to the key
- Access to the internet
- Have a wired connection
- Default BIOS settings
Solution
To recover the operating system, use these steps:
- Sign in to Lenovo Cloud Deploy (https://lenovoclouddeploy.com).
- For Email, enter: Logitechrecovery@logitechrecovery.com.
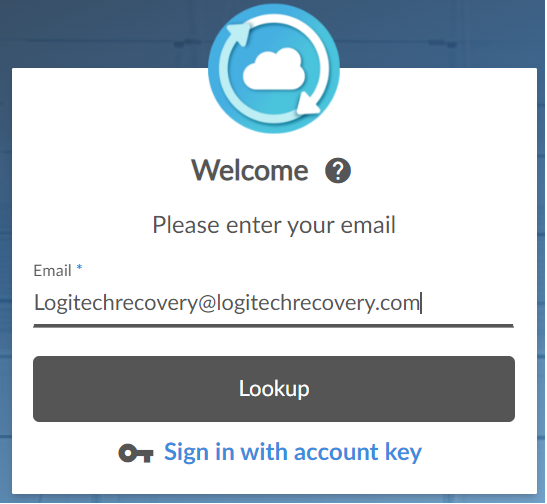
- Click Lookup.
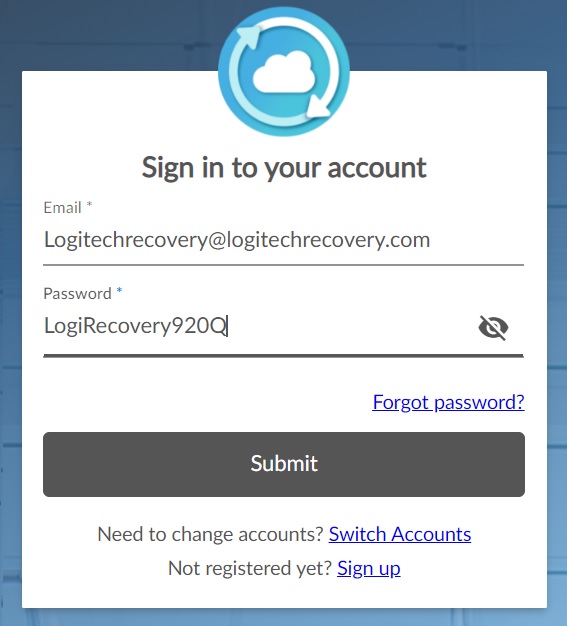
- For Password, enter LogiRecovery920Q and then click Submit.
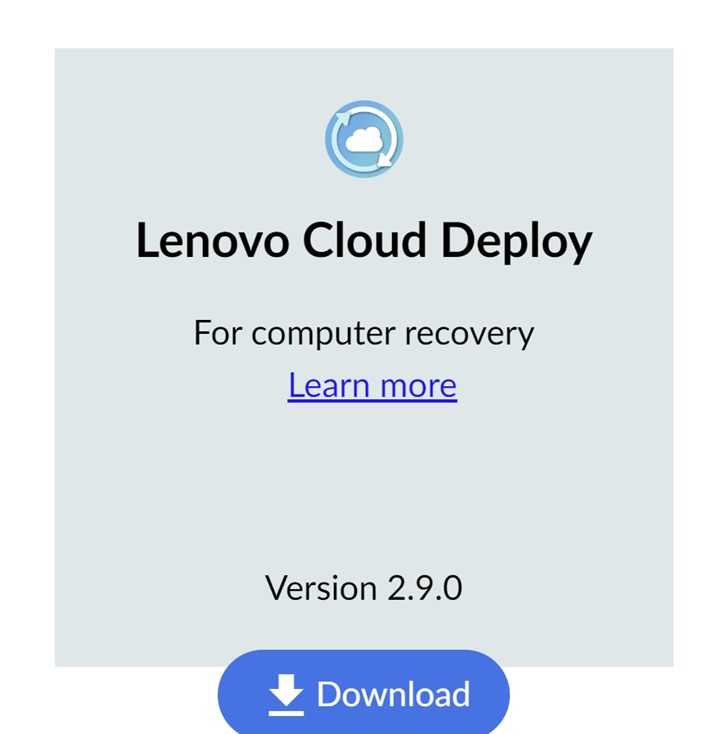
- Scroll down the page until the Lenovo Cloud Deploy Download button appears. Click on the Download button under Lenovo Cloud Deploy.
- When the download finishes, run LenovoCloudDeploySetup.exe.
- On the Welcome screen, click Next.
- Check the boxes for Lenovo’s License Agreement, Lenovo’s Software Privacy Statements and Personal Data Disclaimer, then click the Next button.
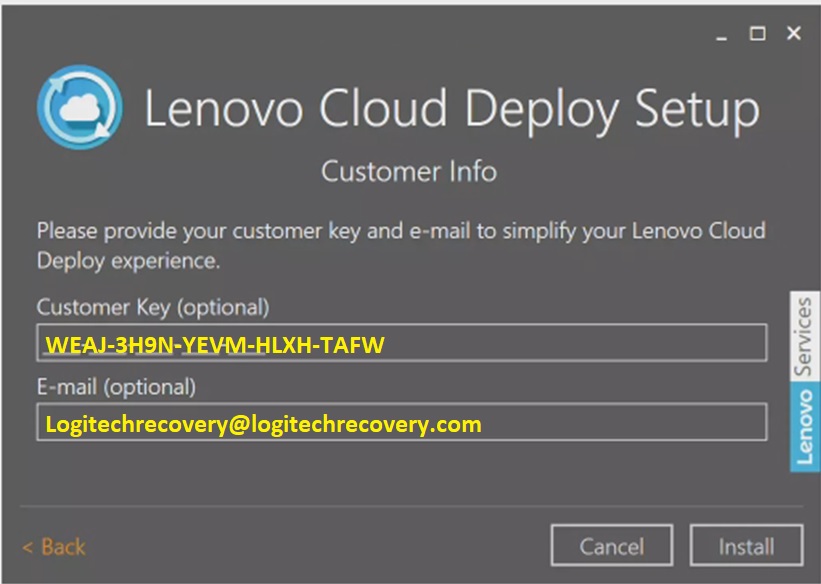
- Follow the on-screen instructions until you reach the Customer Info page where you are asked to enter your Customer Key and Email:
- Customer Key: WEAJ-3H9N-YEVM-HLXH-TAFW
- Email: Logitechrecovery@logitechrecovery.com
- Click Install to begin the installation.
- If the User Account Control appears, click Yes to allow the install.
- Click the launch button after the installation is complete.
- The login populates the User Name with Logitechrecovery@logitechrecovery.com. Enter the password: LogiRecovery920Q, then click Sign In.
- Click Restore another computer.
- Click It does not have a wired internet connection.
- The screen to create USB media appears. Click Next.
- On the next screen, choose the image you want to restore by clicking the On Media button. Then click Next. The USB Key is created when you see the screen title Follow these steps to begin the Lenovo Deployment. Click Finish.
- Note: This step may take a few minutes based on the speed of your network and the size of the image.
- Ensure that the USB key you are using is larger than the size of the image you wish to restore.
- Connect the Lenovo Cloud Deploy USB Media to the target computer.
- Temporarily disconnect the target computer from the network by unplugging the network cable.
- Turn on or reboot the computer.
- For a Lenovo computer, press Enter to interrupt normal startup and select the option to choose a temporary startup device.
- Select the appropriate boot entry that references your USB boot media.
- The computer boots from the USB device and launches Lenovo Cloud Deploy.
- Follow the prompts to recover the system:
- You are not connect to the internet. Click Continue.
- Restore a computer using Lenovo Cloud Deploy. Click Next.
- Choose your deployment. Click Next.
- The system is recovered when prompted to remove the USB key and click reboot.
- Reconnect the system to the network and reboot.
Related Articles
Was this information helpful?
Your feedback helps to improve the overall experience
Document ID:HT515286
Original Publish Date:05/11/2023
Last Modified Date:02/19/2025

