How to remove a saved Wi-Fi network under Windows 10 and 11
How to forget a saved Wi-Fi network under Windows
How to forget a saved Wi-Fi network under Windows
Description
This article describes how to delete a saved Wi-Fi network.
Operating Systems
- Windows 11
- Windows 10
Solution
Note: Removing a saved Wi-Fi network means you will lose the automatic connection to that network. If you are experiencing connectivity issues or other problems, you might need to reset your network settings entirely. This will remove all saved Wi-Fi networks, along with other network-related configurations.
Remove a saved Wi-Fi network under Windows 11
Windows 11 - Method 1
- Select Manage Wi-Fi connections on the Wi-Fi quick setting (or right-click the network icon in the taskbar).
- Select the Wi-Fi network.
- Select Disconnect.
Windows 11 - Method 2
- Select Start and Settings.
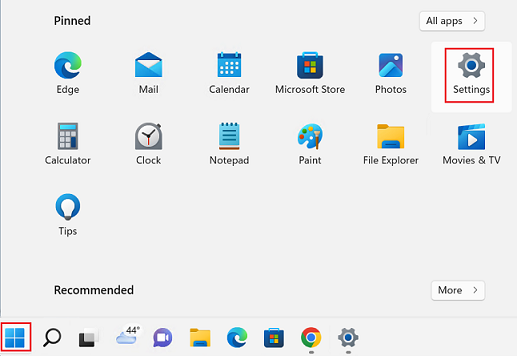
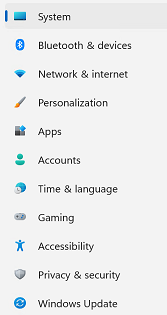
- Select Network and internet.
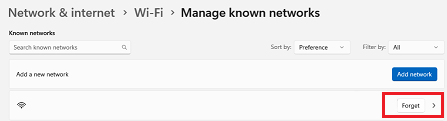
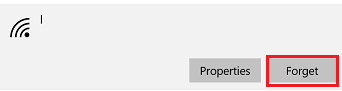
- Select Wi-Fi, Manage known networks, select the network, and Forget.
For more information, see Fix Wi-Fi connection issues in Windows.
Remove a saved Wi-Fi network under Windows 10
Windows 10
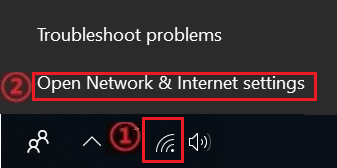
- Right-click the Network icon on the lower right corner of the screen (or click the Wi-Fi icon, select the network, and select disconnect). For more information, see Fix Wi-Fi connection issues in Windows.
- Click Network & Internet settings.
- Click Wi-Fi and then click Manage known networks.
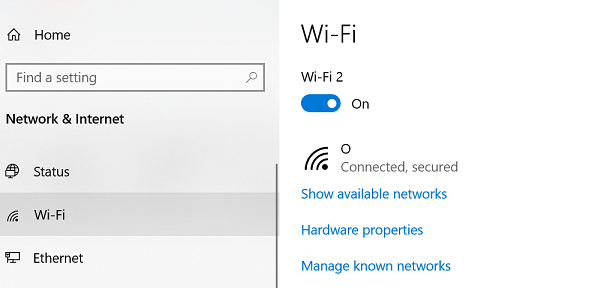
- Click the network to remove or delete under the Manage known networks list, then click Forget.
Related Articles
ข้อมูลนี้มีประโยชน์หรือไม่
ความคิดเห็นของคุณช่วยปรับปรุงประสบการณ์โดยรวม
รหัสเอกสาร:HT500422
วันที่เผยแพร่ต้นฉบับ:05/31/2016
วันที่แก้ไขล่าสุด:12/19/2024

