如何使用ThinkSystem伺服器的 XCC Redfish REST API 更新系統韌體
如何使用ThinkSystem伺服器的 XCC Redfish REST API 更新系統韌體
如何使用ThinkSystem伺服器的 XCC Redfish REST API 更新系統韌體
描述
Lenovo XClarity Controller (XCC) 為業界標準 Redfish 可擴展平台管理 API 提供支持,該 API 可用於從 XCC 外部運行的應用程式存取 XCC 資料和服務。 Redfish 使用 RESTful 介面語意學和 JSON 資源負載透過基於 Web 的協定執行系統管理。
本文介紹使用 XCC Redfish REST API 更新系統韌體的流程。
本文將使用以下 HTTP 方法:
- GET:讀取請求-用於請求指定的資源或集合來檢查數據
- POST:動作請求-用於發起作業或建立資源
適用系統
ThinkSystem (HR330A、HR350A、HR630X、HR650X 除外)、SR645、SR665
先決條件
- 您的工作站或筆記型電腦上必須安裝 Redfish 用戶端。
- 紅魚客戶:
- Chrome:Postman、Talend API 測試器
- 火狐:REST客戶端
- 工作站或筆記型電腦必須能夠直接透過網路存取目標伺服器上的 XCC。
程式
請依照以下步驟,使用 XCC Redfish API 方法更新系統韌體層級。
下載所需的韌體包
- 從Lenovo支援頁面下載適合您的機器的韌體包。
- 解壓縮檔案並將內容複製到指定資料夾。
檢索已安裝的韌體版本
- 若要存取韌體清單集合中的屬性,請開啟 postman,選擇GET方法① ,然後輸入下列要求的 URL ② :https:// BMCIP /redfish/v1/UpdateService/FirmwareInventory
- 在授權標籤中,從類型選單③中選擇基本驗證,然後輸入 BMC 憑證④ 。點選發送⑤ 。

注意:每個請求都需要此授權步驟。
回應範例
如果請求成功,會傳回類似如下的訊息體:
{ "成員": [ { "@odata.id": "/redfish/v1/UpdateService/FirmwareInventory/BMC-Primary" }, { "@odata.id": "/redfish/v1/UpdateService/FirmwareInventory/BMC-備份" }, { "@odata.id": "/redfish/v1/UpdateService/FirmwareInventory/UEFI" }, { "@odata.id": "/redfish/v1/UpdateService/FirmwareInventory/LXPM" }, { " @odata.id": "/redfish/v1/UpdateService/FirmwareInventory/LXPMWindowsDriver" }, { "@odata.id": "/redfish/v1/UpdateService/FirmwareInventory/LXPMLinuxDriver" }, { "@odata.id": "/redfish/v1/UpdateService/FirmwareInventory/Ob_1.Bundle" }, { "@odata.id": "/redfish/v1/UpdateService/FirmwareInventory/Slot_4.Bundle" }, { "@odata.id": "/ redfish/v1/UpdateService/FirmwareInventory/Ob_5.Bundle" }, { "@odata.id": "/redfish/v1/UpdateService/FirmwareInventory/Ob_4.Bundle" }, { "@odata.id": "/redfish/ v1/UpdateService/FirmwareInventory/Ob_1.1" }, { "@odata.id": "/redfish/v1/UpdateService/FirmwareInventory/Ob_1.2" }, { "@odata.id": "/redfish/v1/ UpdateService/FirmwareInventory/Slot_4.1" }, { "@odata.id": "/redfish/v1/UpdateService/FirmwareInventory/Disk1" }, { "@odata.id": "/redfish/v1/UpdateService/FirmwareInventory/磁碟2" }, { "@odata.id": "/redfish/v1/UpdateService/FirmwareInventory/Disk3" }, { "@odata.id": "/redfish/v1/UpdateService/FirmwareInventory/Disk4" }, { " @odata.id": "/redfish/v1/UpdateService/FirmwareInventory/Disk5" }, { "@odata.id": "/redfish/v1/UpdateService/FirmwareInventory/Disk6" }, { "@odata.id" : "/redfish/v1/UpdateService/FirmwareInventory/PSU1" } ], "@odata.type": "#SoftwareInventoryCollection.SoftwareInventoryCollection", "@odata.id": "/redfish/v1/UpdateService/FirmwareInventory", "MrmwareInventory", "MrmwareInvenware @ odata.count":20,"@odata.etag":"\"af76d20eb1af2e197f855\"","名稱":"SoftwareInventoryCollection","描述":"韌體庫存集合。 }
- 從成員清單的輸出中,找到您要查詢的系統韌體端點 - 例如/redfish/v1/UpdateService/FirmwareInventory/UEFI 。將其輸入 URL 欄位以取得 UEFI 資訊。
{ "ReleaseDate": "2020-09-18T00:00:00Z", "RelatedItem": [ { "@odata.id": "/redfish/v1/Systems/1/ Bios " } ], "Id": " UEFI", "Status": { "HealthRollup": "OK", "Health": "OK", "State": "Enabled" }, "Manufacturer": " Lenovo ", "Name": "韌體:UEFI" ,“版本”:“60N-2.71”,“SoftwareId”:“UEFI-IVE1-6”,“RelatedItem@odata.count”:1,“@odata.type”:“#SoftwareInventory.v1_2_3.SoftwareInventory”,“ @odata.id": "/redfish/v1/UpdateService/FirmwareInventory/UEFI", "可更新": true, "@odata.etag": "\"3d193e9f3c0c2725df0\"", "LowestSupportedVersion": null, "描述" : “UEFI韌體資訊。” }
在上面的回應資料中,安裝的 UEFI 為60N-2.71 ,軟體 ID 為UEFI-IVE1-1.6 。
應用程式韌體更新
UEFI 更新
- 選擇POST方法,然後輸入以下請求的 URL: https:// BMCIP /fwupdate
- 在POST操作的「內文」標籤中,選擇「二進位」 ,然後選擇要更新的韌體映像。

- 按一下“發送” 。

- 如果請求成功,將顯示回應代碼狀態202 Accepted 。訊息正文將類似於以下範例:
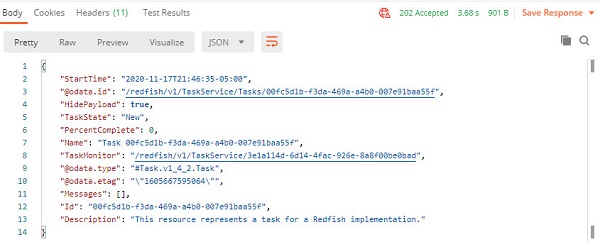
在上面的回應範例中, /redfish/v1/TaskService/Tasks/00fc5d1b-f3da-469a-a4b0-007e91baa55f是剛剛建立的新任務。您可以使用Get方法透過任務ID查詢更新狀態。
請求的網址
https:// BMCIP /redfish/v1/TaskService/Task/ ID
回應範例
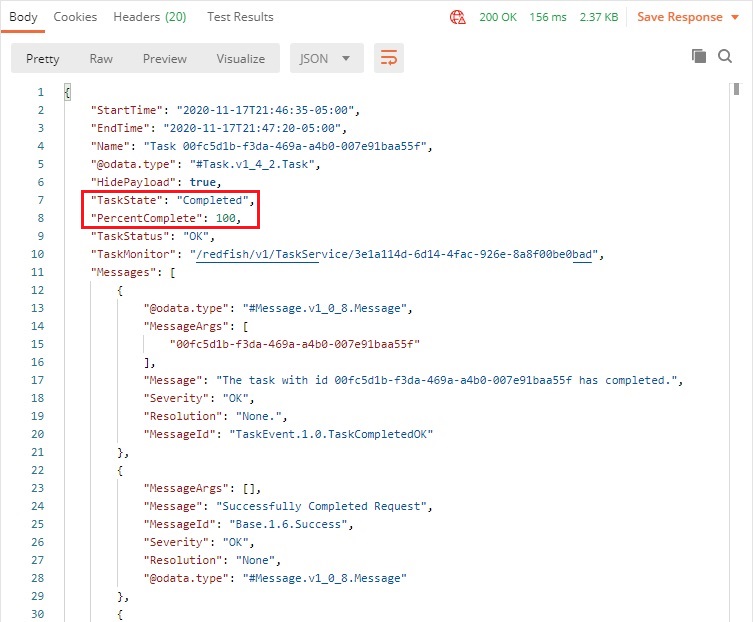
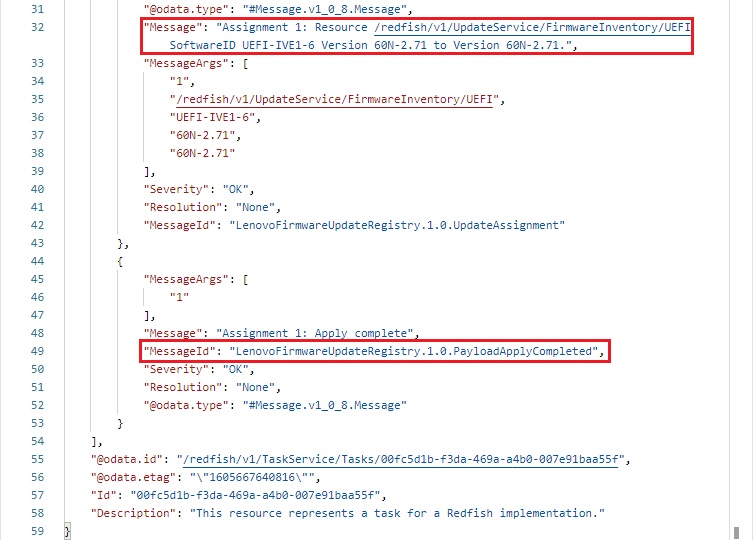
- 重新啟動伺服器並再次執行韌體清單。 BIOS版本將已更新。
您也可以使用POST方法來執行系統重新啟動。
請求的網址
https: //BMCIP/redfish/v1/Systems/1/Actions/ComputerSystem.Reset
POST 操作請求的正文:
{“ResetType”:“GracefulRestart”}
# 系統重置類型的可能值可以是On/ForceOff/GracefulShutdown/GracefulRestart/ForceRestart/Nmu/ForceOn 
回應範例
將傳回以下 JSON 回應:
沒有任何
XCC更新
- 選擇POST方法,然後輸入以下請求的 URL: https:// BMCIP /fwupdate
- 在POST操作的「內文」標籤中,選擇「二進位」 ,然後選擇要更新的韌體映像。

- 按一下“發送” 。

- 如果請求成功,將顯示回應代碼狀態202 Accepted 。訊息正文將類似於以下範例:
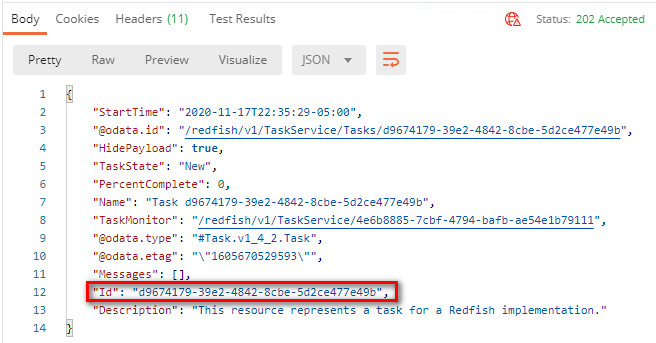
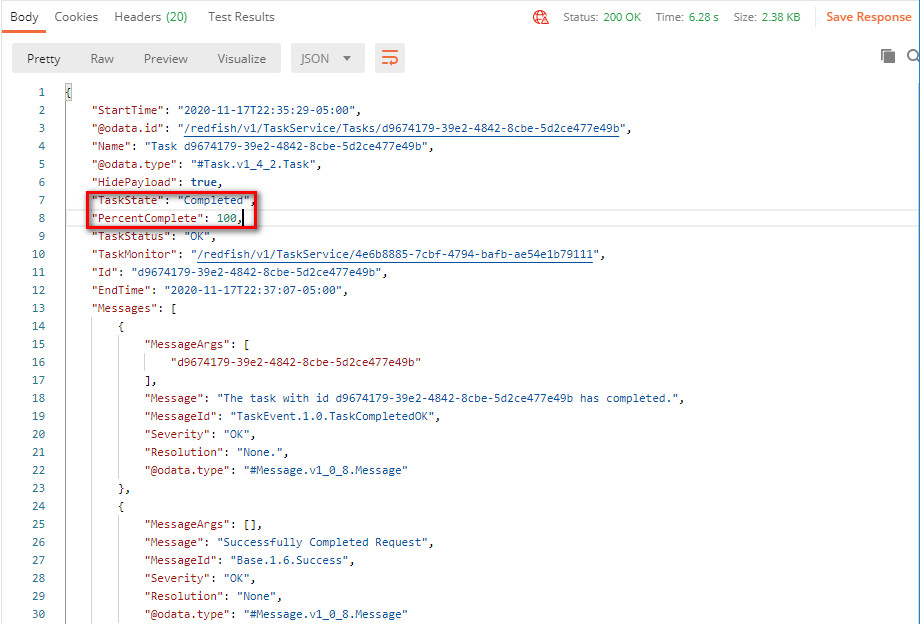
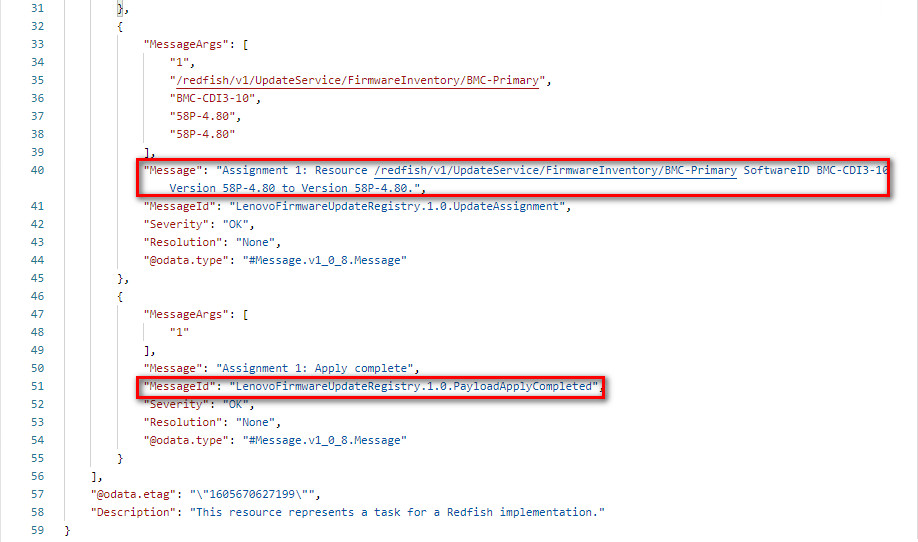
在上面的回應範例中, /redfish/v1/TaskService/Tasks/d9674179-39e2-4842-8cbe-5d2ce477e49b是剛剛建立的新任務。您可以使用Get方法透過任務ID查詢更新狀態。
請求的網址
https:// BMCIP /redfish/v1/TaskService/Task/ID
回應範例
- 重新啟動伺服器並再次執行韌體清單。 XCC 版本將已更新。
您也可以使用POST方法重新啟動XCC。
請求的網址
https://BMCIP/redfish/v1/Managers/1/Actions/Manager.Reset
POST 操作請求的正文:
{“ResetType”:“GracefulRestart”}
# XCC重置類型的可能值可以是GracefulRestart/ForceRestart
回應範例
將傳回以下 JSON 回應:
沒有任何

