How to insert a CD in the CD-ROM, CD-RW, or DVD drive - ThinkPad
How to insert a CD in the CD-ROM, CD-RW, or DVD drive - ThinkPad
How to insert a CD in the CD-ROM, CD-RW, or DVD drive - ThinkPad
Note: If you have a ThinkPad laptop, make sure the laptop actually has a CD/DVD drive. Only select models of ThinkPad laptops come with CD/DVD drives. Most newer systems no longer have built-in CD/DVD drives. Models without CD/DVD drives must use an external USB drive or other solution.
The following instructions explain how to insert a CD into the CD-ROM, CD-RW, or DVD drive on any ThinkPad system with a CD-ROM, CD-RW, or DVD drive.
Notes:
- Not all ThinkPad systems come with a CD-ROM, CD-RW, or DVD drive installed internally on the computer.
- The format capabilities of the drive are listed on the label on the external cover of the drive.
- The CD-ROM, CD-RW, or DVD drive can be opened using the emergency eject hole if the drive will not open and a disc needs to be removed.
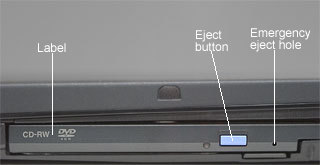
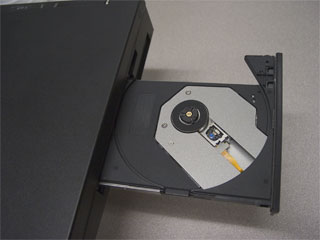
Open the drive tray using the drive eject button - do not force or pry the tray open. The tray will pop out partially.
Or
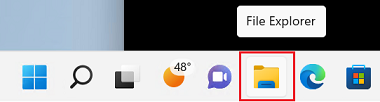
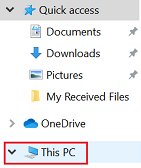
Windows 10, 11
- To get to This PC, open File Explorer from the taskbar and select This PC in the left pane.

- Click the DVD drive icon and click the Eject button on the toolbar or right-click the optical drive and choose Eject from the menu.
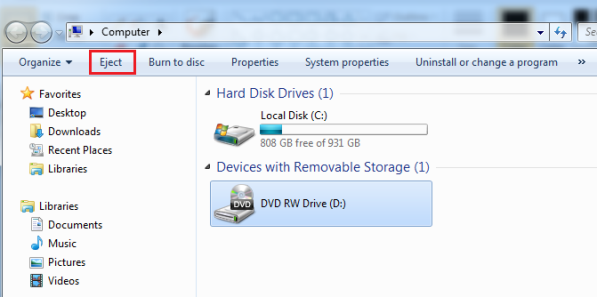
Image 1
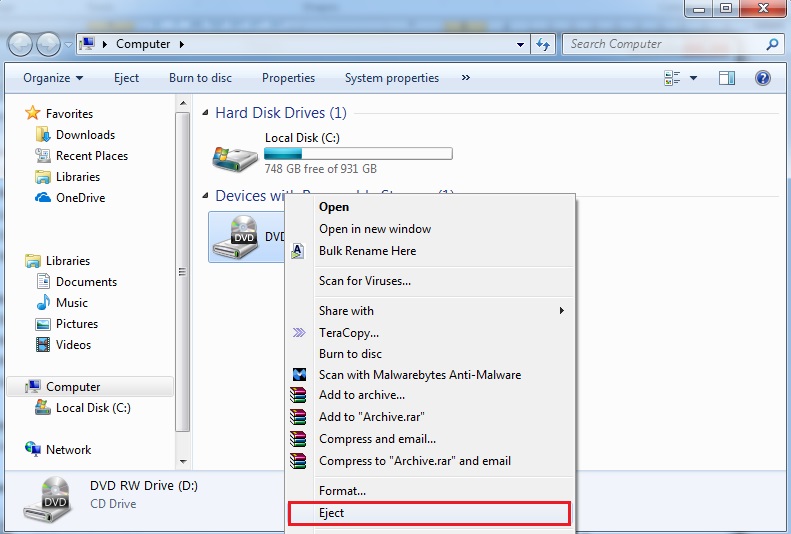
Image 2
Once the tray is partially open:
1. Slide the drive tray out fully.
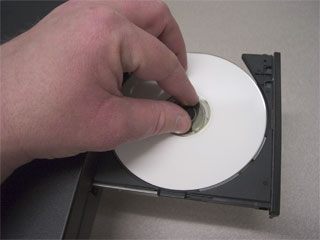
Attention: Do not touch the drive lens.
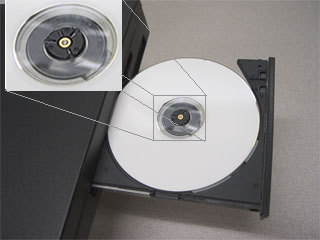
2. Align the center hole of CD with the drive spindle.

3. Install the CD by pressing the CD near the center until all three positive lock-down devices on the drive spindle lock into place.
Note: The CD must be installed into and not merely placed onto the tray. When you insert the CD, the label should be facing up.
4. Carefully close tray.
Additional Information
Typically, the disc will start playing automatically. If it does not play, open Windows Media Player, and then, in the Player Library, select the disc name in the navigation pane. Troubleshoot Play a CD or DVD in Windows Media Player.
Note:
- Windows Media Player is included with Windows 10 desktop. Note that the app no longer plays DVDs.
- Windows DVD Player app enables Windows 10 PCs with an optical disc drive to play DVD movies (but not Blu-ray discs). You can buy it in the Microsoft Store. Read more DVD playback options for Windows.
- Blu-ray Disc format is not supported in Windows Media Player or Windows DVD Player app. To play a Blu-ray Disc, use a non-Microsoft program that supports Blu-ray playback and a device capable of reading Blu-ray Discs.
If a message occurs that says the computer is missing a codec or that a DVD decoder is required, you are probably trying to play, burn, or sync a file that was compressed by using a codec that Windows or the Player does not include by default. For more information about codecs, see Codecs: frequently asked questions.
Related Articles
- How to play CDs or DVDs in my system
- How to run CD or DVD automatically – ThinkPad
- Your CD drive or DVD drive is missing or is not recognized by Windows or other programs
- How to create a USB recovery drive and use it to recover Windows 10
- Windows Support Center
- CD, DVD, or CD-RW disc cannot be read - ThinkPad, ideapad
Your feedback helps to improve the overall experience

