How to restore factory settings - idea laptops, desktops
Step-by-Step Guide: Restoring Factory Settings on Idea Laptops and Lenovo Desktops
Step-by-Step Guide: Restoring Factory Settings on Idea Laptops and Lenovo Desktops
Description
Restoring the device to factory settings or restores the device to the state it was when originally shipped.
Notes:
- Lenovo OneKey Recovery is not applicable to Think brands such as ThinkPad.
- For information about resetting your Chromebook (Powerwash), see Reset your Chromebook to factory settings.
Applicable Brands
idea/Lenovo laptops and desktops
Operating Systems
- Windows 10
- Windows 11
Solution
Restore system to factory default
Use one of the following methods to restore the system to the factory default:
1. Obtain recovery media on DVD or USB from Lenovo's download site or the support center. Use the instructions in this link: How can I create Recovery Media (DVD or USB), or order Recovery Media (DVD or USB) from Lenovo. For instructions about using the recovery key, see step 3 in Lenovo Digital Download Recovery Service (DDRS): Download the files needed to create a Lenovo USB Recovery key, or watch this instructive video:
2. If the PC has Lenovo OneKey Recovery, use the following information:
The OneKey Recovery (Novo button) is either a small button or pinhole with a backwards arrow icon. This button comes with Lenovo Onekey recovery software and it allows you to quickly restore the operating system. Note: The Novo button may be located at different places on different models. If you cannot find it, see the User Guide for a detailed reference. Go to Lenovo official support website, and search to find your model's user guide. In the Novo button menu, click System Recovery > Troubleshoot > Reset this PC > Keep my files, then follow the on-screen guide to reset or restore the system.
Note: Make sure your device is connected to the charger as it may take up to a few hours to complete and your device needs to have power at all times.
If your device does not have a Novo Button, hold down the power button for 10 seconds to turn it off. Press the power button again to turn it on. On the first sign that Windows has started hold down the power button for 10 seconds to turn off your device again. Repeat this step and after two consecutive failed boot attempts, the Windows recovery environment starts automatically. Choose Troubleshoot > Reset this PC > Keep my files, then follow the on-screen guide to reset or restore the system.
Reset or refresh the PC or create a USB recovery drive in case of operating system corruption
Boot into Safe mode
If the PC will not boot into Windows, try the information in this Microsoft link: Start your PC in safe mode in Windows 10/11
Windows only runs necessary drivers and services in this mode.
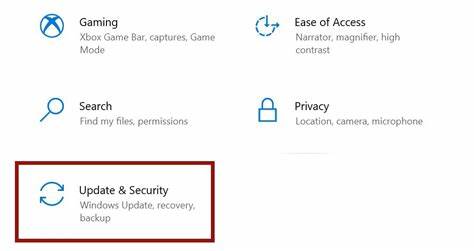
- Search to open Settings > Update & Security.
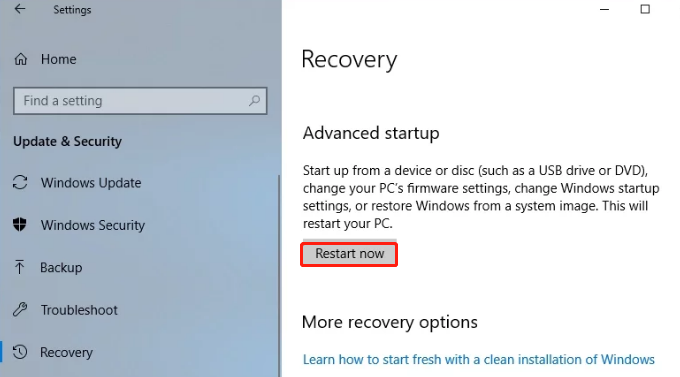
- On the left pane, click Recovery. Click Restart now under Advanced Startup.
- After restart, choose Troubleshoot > Advanced Options.
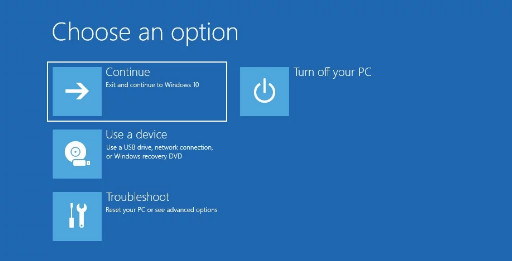
- Open Startup Settings, click Restart. After restart, choose Safe Mode or Safe Mode with Networking.
Related Articles
- [Video] How to use System Restore Points in Windows 10
- How to create a system restore point - Windows 10
- Introduction to NOVO button
- Recovery options in Windows 10
- Start your PC in safe mode in Windows 10
- How to a backup system image/repair boot disk in Windows 10
- [Video] How to restore your PC to a previously working state outside of Windows
- Windows Support Center
Your feedback helps to improve the overall experience

